The PwrPak7 family of GNSS receivers includes the PwrPak7, PwrPak7D, PwrPak7-E1, PwrPak7D-E1, PwrPak7-E2, PwrPak7D-E2, PwrPak7M and PwrPak7Q enclosures.
There are several hardware versions of the PwrPak7 to meet a range of GNSS applications as detailed below.
PwrPak7 Models
- PwrPak7: The PwrPak7 uses the OEM7700 receiver card to deliver scalable high precision positioning solution in a compact, lightweight enclosure.
- PwrPak7D: The PwrPak7D is a dual antenna enclosure that uses the OEM7720 receiver card to provide a high precision positioning and heading solution.
- PwrPak7-E1: The PwrPak7-E1 combines GNSS and INS hardware in a single enclosure to provide an easy to deploy SPAN GNSS+INS system. The PwrPak7-E1 uses an OEM7700 receiver card to deliver scalable high precision positioning and an Epson G320N IMU to deliver accelerometer and gyroscope measurements.
- PwrPak7D-E1: The PwrPak7D-E1 combines dual antenna GNSS and INS hardware in a single enclosure to provide an easy to deploy SPAN GNSS+INS and ALIGN system. The PwrPak7D-E1 uses an OEM7720 receiver card to deliver scalable high precision positioning and heading, and an Epson G320N IMU to deliver accelerometer and gyroscope measurements.
- PwrPak7-E2: The PwrPak7-E2 combines GNSS and INS hardware in a single enclosure to provide an easy to deploy SPAN GNSS+INS system. The PwrPak7-E2 uses an OEM7700 receiver card to deliver scalable high precision positioning and an Epson G370N IMU to deliver accelerometer and gyroscope measurements. The Epson G370N is a high-performance MEMS IMU that provides higher data rates and improved SPAN performance.
- PwrPak7D-E2: The PwrPak7D-E2 combines dual antenna GNSS and INS hardware in a single enclosure to provide an easy to deploy SPAN GNSS+INS and ALIGN system. The PwrPak7D-E2 uses an OEM7720 receiver card to deliver scalable high precision positioning and heading, and an Epson G370N IMU to deliver accelerometer and gyroscope measurements. The Epson G370N is a high-performance MEMS IMU that provides higher data rates and improved SPAN performance.
- PwrPak7M: The PwrPak7M is a variant of the PwrPak7 receiver with the Wi-Fi radio and 16 GB of internal memory removed. There are M variants for all versions of the PwrPak7 apart from the E2 models. For example, a PwrPak7M-E1 is a PwrPak7-E1 with no Wi-Fi and no internal memory for onboard log storage.
- PwrPak7Q: The PwrPak7Q is a variant of the PwrPak7 receiver with the Wi-Fi radio removed. There are two versions of the PwrPak7Q. The PwrPak7Q-E2 uses an OEM7700 receiver card and an Epson G370N IMU to provide an easy to deploy, high performing SPAN GNSS+INS system. The PwrPak7DQ-E2 uses a dual antenna OEM7720 receiver card and Epson G370N IMU to provide an easy to deploy, high performing SPAN GNSS+INS and ALIGN system.

PwrPak7 / PwrPak7-E1 / PwrPak7-E2 / PwrPakQ-E2 Enclosure
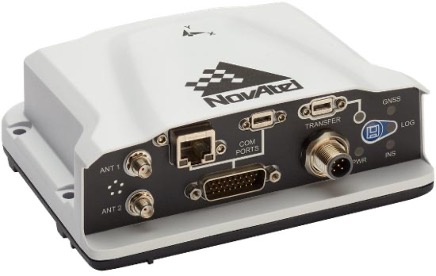
PwrPak7D / PwrPak7D-E1 / PwrPak7D-E2 / PwrPak7DQ-E2 Enclosure
Identifying the PwrPak7 Model and Product Serial Number (PSN)
As outlined above, it is important to know which PwrPak7 model you have so that you can understand the capabilities of your unit. The product serial number (PSN) is unique to the unit and is needed when connecting to the unit via Wi-Fi. Both pieces of information are also useful if contacting NovAtel Support to help with queries.
There are two different options available to obtain the model name and product serial number (PSN) of the PwrPak7; either looking at the label on the unit, or using a terminal program.
Label
The bottom of the PwrPak7 enclosure includes a label which details the model and product serial number (PSN) of the unit, as shown in the image below.

Model names listed on the label match the marketing names above as follows:
- PW7700 = PwrPak7
- PW7720 = PwrPak7D
- PW7700E1 = PwrPak7-E1
- PW7720E1 = PwrPak7D-E1
- PW7700E2 = PwrPak7-E2
- PW7720E2 = PwrPak7D-E2
- PW7700M = PwrPak7M
- PW7720M = PwrPak7DM
- PW7700ME1 = PwrPak7M-E1
- PW7720ME1 = PwrPak7DM-E1
- PW7700QE2 = PwrPak7Q-E2
- PW7720QE2 = PwrPak7DQ-E2
To confirm that the label information matches with the enclosure, the Command instructions below should also be followed.
Command
On the Home page of NovAtel Application Suite or Setup & Monitor (Web) when the PwrPak7 is either connected via USB or Wi-Fi, go to Tools and click on Terminal. A terminal box is then shown, go to the box that has a label “Enter your command” and enter the command: log version once. If the command is typed correctly, you should receive data as below.
<OK
[WCOM1]
<VERSION WCOM1_30 0 69.5 UNKNOWN 0 232.271 024c4020 3681 16409
< 11
< GPSCARD "FDDRYNTBNP1" "DMMU21380074W" "OEM7720-1.01" "OM7CR0800RN0000" "OM7BR0200RB0000" "2020/Oct/15" "14:06:15"
< OEM7FPGA "" "" "" "OMV070001RN0000" "" "" ""
< WHEELSENSOR "" "" "" "SWS000201RN0000" "" "" ""
< APPLICATION "" "" "" "EP7AR0800RN0000" "" "2020/Oct/15" "14:06:22"
< DEFAULT_CONFIG "" "" "" "EP7CR0800RN0000" "" "2020/Oct/15" "14:06:28"
< PACKAGE "" "" "" "EP7PR0800RN0000" "" "2020/Oct/15" "14:06:25"
< DB_WWWISO "WWWISO" "0" "" "1.7.0" "" "2021/Dec/14" "10:59:42"
< ENCLOSURE "PWRPAK7D-E1" "NMPM21490004D" "" "" "" "" ""
< WIFI "RS9113" "" "" "1.6.8" "" "2020/Oct/15" "14:06:34"
< REGULATORY "US" "" "" "" "" "" ""
< IMUCARD "Epson G320N 125" "00016048" "G320PDGN" "2510" "" "" ""
[WCOM1]
Look for the line ENCLOSURE and you’ll find your PwrPak7 model (“PWRPAK7D-E1” in the example above) and product serial number (PSN) ("NMPM21490004D" in the example above).


